Wednesday, November 13, 2013

A Bumble Bee for John Clare

The first proofs of this little bee lino cut. I am planning a series of bees for one of my favourite poets John Clare.

image

This is a first proof and the block needs some work, but it is always an “interesting” moment.Usually accompanied by “ Ah.. Ok .. well maybe..”

 image

 A Bumble Bee Amongst the Early Willows   Sepia waterbased ink. Image size 4.75 x 4.75 inches.

If things go according to plan there will be a small booklet of images accompanied with text. However it involves a bit of work on the Adana which is a whole different thing.

Monday, November 11, 2013

Berry Prints : Small Worlds

A few more prints of the berry.The final colours, numbers 3 and 4.  This final cut was based on my Sloe Globe drawings over at Pencilandleaf . The patterns on the sloes fascinate me. I have only added the coloured stalk to 2 of them so far. I have tried to be methodical and disciplined with these prints and almost all of them have worked OK.

  image

Looking at them now there are quite a few things I would change. But I am rather pleased that the registration system worked Ok. The mask to isolate the sphere worked too but was a bit fiddly.. They vary in colour as I tried different combination of tones and the print quality varies so much with different papers and different inking. It is very interesting and a good learning process.
I think I could have achieved more translucence with oil colours and a medium but these are fine for now. I resisted the temptation to paint the stalks in.  I just inked up a little of the block at the base.

image

More berries with the cut-away print in the middle there. I made 12 prints. If I had taken a bit more care they would all have been OK. Lessons learnt.

image image

Blue and Red Berry Worlds, 4 & 5 colour reduction print. Image 6 x6 inches

Saturday, November 9, 2013

Berry Print: Stage 2

For the second colour of the blue berry print I lightly inked up the plate to get a patchy dusty look of a sloe. It worked quite well/

image 
Second colour on blue

I am just not sure how the red berry will work or how dull the colours may become with overprinting. I am just using waterbased cheap “inks” which are really an acrylic I think but with an added retarding agent. They are a bit dull which is fine for the blue but not so good for the red. So I have varied the second colour from a yellow to an orange.

image
Second colour on yellow.

OK so far and the registration plate seems to be working.I am dithering about an intermediate colour before the final one…. Unsure unsure..

I decided on an intermediate colour for the red berries in the hopes of getting some depth of colour. To keep the background from printing I cut a mask. Fiddly but worth it and probably quicker than cutting all the back ground away.

image
Third colour on yellow.

I am learning so much with these simple exercises . I think with printmaking as with most other skills you have to keep on doing it to get a feel for the inks, the paper, the press etc. There are many many variables.

Thursday, November 7, 2013

First Steps of Vinyl Berry Print

Yesterday I was painting berries and thought a simple lino cut of a berry would be a good subject to try on a piece of vinyl I have. It will also be good practice for reduction printing, which involves getting some sort of registration sorted out and for trying some more papers.

There was not much drawing involved so I drew directly on to the vinyl and cut the first highlights.

image 
Block and a first proof taken.

They are on my rough-and-ready registration plate, made with bits of card on a piece of hardboard. It’s adapted from the plate I used for the big bees. It’s not wildly accurate but will do for now.

image 
Some prints of the twelve I made of the first plate, in two different colourways.

It’s impossible to know how many you may need to get just one precious perfect completed print. Print more than you think you will need…lots more.  Once you start to cut the plate again there is no going back.

image

More vinyl cut away for the second colour. It’s slippery. My finger tips are getting progressively more shredded,  there is blood everywhere..but I guess I will learn!

Tuesday, November 5, 2013

First Jigsaw Print

I have read about jigsaw prints
It is a simple way of printing two colours in one go, by cutting up the plate and inking the pieces separately. I had cut this little bird using the rubbery easycut stuff some time ago and taken a proof in black, but there were so many mistakes I had rather abandoned  it. But rather than cut a new block it seemed a good candidate for trying a jigsaw print.

So I cut the block into 3 pieces to roughly isolate the bird  from  the background.


Although it’s the easycut rubbery stuff it is not that easy to cut in two and I can see that one disadvantage of this sort of block is that it can ( and does) stretch quite easily.

The blocks are then inked up in different colours, re-assembled and printed.

 
Re-assembled block ready to print.

Some trials on different papers with different colours.

I am not very keen on the easycut block. I found when cutting the original image that the tools slipped often and  I didn’t seem to have much control..but then this could well be  (ie probably was) operator error :). I have seen lovely things made using it, so I will persevere.

bg starling starling 2

Greedy Starlings… very rough jigsaw print. Image 5 x 4 inches

I wanted to print a pale colour onto Kraft paper  but this was not very successful and I realise I will have to look at more opaque inks. Probably better quality ones. Also I doubt the lightfastness of Kraft. Not that is matters at the moment, as I am just experimenting but sod’ s law guarantees I will print my best image on something that will fade.

It was interesting to see these results.  I liked the technique and the image, just not the execution, neither the cutting nor the printing,  so l’ll probably try another plate.

I was thinking about all-over patterns at the time and it was based on the busy spotty starlings who hoover up ALL the mealworms and grains that we scatter on the paving by the kitchen. We are rather fond of them.. greedy or not.

Sunday, November 3, 2013

Topkapi Print and Movember

This month is #portraitnovember on Twitter. I don’t really do much in the way of portraits as such, but this morning Chris also told me it’s “ Movember “ this month when men and maybe women will endeavour to grow moustaches to raise money for men’s health. It’s both worthy and fun.

So in order to get some more lino cutting practise, do a portrait for #portraitnovember and give a hat tip to Movember, I decided  to rework an illustration from years ago.

 bg topkapi

The original was a small scraperboard I made for the poem “ Topkapi”  by John Fuller in a poetry anthology and seemed worth trying it in a different medium. It also saves me a bit of time.

scraper illust

Scraperboard is not a million miles away from lino. It was a medium I loved working in but sadly, the excellent profession grade white Essdee scraperboard is not available any more. You can work in a very fine detail on scraperboard ..so completely different from lino…or I should say from my rather chunky and inexperienced cutting.

bg rough moustache

I made a rough sketch based on my illustration and when I was transferring it to the block it occurred to me to make him a moustache vendor.
I cut a quick lino block and made an initial proof . It needs work and a bit of reorganisation but hopefully it will look something like this .

moustache  bg

First proof image 6 x6.5 inches

It will be interesting to see how/if it works. The flying moustaches are like little birds or perhaps escaping worms,  I like that. I shall call it The Moustache Seller :).

Friday, November 1, 2013

Revisiting Fly Bee Night

Today I wanted to have another look at my one and only woodcut which I made a couple of years ago in a one day “off campus” workshop with the very excellent Leicester Print Workshop.

In just one day it was quite a challenge to get the block cut once, printed, cut again for the second colour then printed again. As with all group workshops there were the usual waits to use the equipment which, combined with my uncertainty of how to go about it all,  slowed me up a good deal. If I had known what I was doing I would have concentrated on making more prints of the first colour, but I did want to see if and how a reduction print worked so galloped on. I ended up with only two reasonable 2 colour prints and three with just one colour.

 
My only two finished prints, one was too pale.
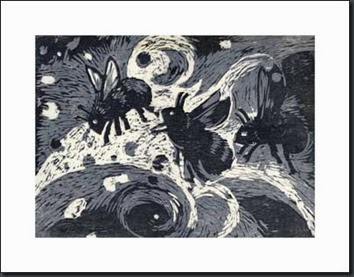
bg fly bee night  g 
The one good print “Fly Bee Night” approx A3  14” x17 “

Being a workshop away from their print studio, it had to be an unfussy process, which was great, using basic materials, B&Q cheap plywood and the back of a spoon to burnish. I have to admit I was rather surprised with the result. It was my first introduction to Japanese Kozo paper too and that was a revelation.

So today, as I still have the final plate of the black image, I made a quick impression  to see what exactly it looks like alone and what I can do with it.
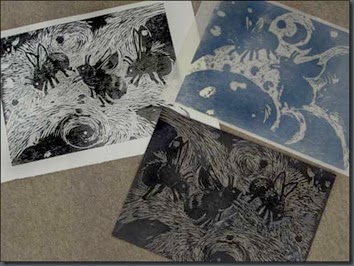
 
The new impression on the left, a print of the old, first colour to the right and the plywood plate underneath.

If I can get the registration right I can complete the other three single colour prints or I can cut another plate for a background.
I think its worth persevering and experimenting with.

There will be cards …soon…